

Seamlessly Deploy, Secure, and Scale Applications with Modern Infrastructure Tools on Google Cloud Platform
Efficiently deploying and exposing applications behind an HTTPS load balancer in Google Cloud is time-consuming. That’s why we decided to automatize this process using Terraform at Astrafy. The goal is to be able to deploy any application or service in Google Cloud by simply applying some terraform resources, which are contained in a module. You can check all the code used in this article in this GitHub repository.
What is needed?
As prerequisites in order to deploy an application we need… an application. We are deploying in GKE so the only two things needed are:
A GKE cluster created in Google Cloud
An application exposed in the cluster with a service
A domain name with a DNS record pointing to the IP that we will create later in the article (This is optional and you can omit it and use directly the IP to access the service. In this case you should omit the creation of the managed certificates as well).
What will we deploy in order for this to work?
The Istio installation inside the cluster
An Istio gateway in order to redistribute traffic to the corresponding services
An ingress that will create Google’s HTTP load balancer
Managed certificates to allow HTTPs connections
The virtual services link the hosts to the correct service inside the GKE cluster
Prerequisites
The first thing we need to have is a GKE cluster ready and the application we want to expose publicly. For the purpose of this article, I have created a GKE cluster in autopilot mode from scratch (it can be any type of GKE cluster, the autopilot mode was simply faster) and deployed a simple Nginx app with the following files.
Installing Istio
We can refer to the official Istio documentation to install Istio on GKE. We are going to adapt the steps using Terraform to avoid providing any manual infrastructure to the cluster.
The first step is creating the namespace, which we do with the following resource.
We then deploy istio-base and istiod. We make istiod depend on istio-base because it needs to have the CRDs installed before it applies.
Finally, we also deploy the Istio Gateway. This resource will be responsible for receiving the traffic after the ingress and redirecting the traffic to the corresponding istio’s virtual services that we will create afterward.
The ingress.yaml file has the configuration for the gateway, which we see in the following code block. The first annotation links the backend configuration to the Gateway. This allows further customization of the load balancer, which in our case will include a health check. The second annotation is used to enable container-native load balancing in Google Cloud which allows load balancers to target Kubernetes Pods directly and to evenly distribute traffic to Pods.
The previous helm chart will deploy a pod and a service responsible for managing the incoming traffic and redirecting it to the proper service. In order for this to work, we also need to deploy the actual Istio Gateway, which we deploy with the following resource.
Lastly, connecting the backend configuration that we set in the helm chart, we create the Backend Configuration that contains the health check. This will be at Google’s Load Balancer level.
Creating the ingress
Before creating the ingress that will create the load balancer in Google Cloud, we need an external IP which will be its entry point. That resource is created as follows.
Then we create another namespace in which to deploy the rest of the resources separated from the Istio-specific installation.
Before the ingress, we need to deploy the managed certificates (only if we have a domain name) that Google will use to allow SSL connections to the services. This means that Google’s load balancer will accept HTTPs traffic and offload the SSL layer to allow a secure connection to our website. This is not mandatory but definitively recommended. To learn more about Google Cloud managed certificated you can check here. We create one certificate per host that we want to add to the Load Balancer.
Finally, we have the ingress. It seems a little complicated but it is pretty straightforward if we look at it step by step. Let’s take a look at the resource to then explain it.
On the annotations, we have:
Managed certificates: To link the certificates to Google’s load balancer
Global static IP name: To use the IP created before as the public IP that we will set in our DNS records.
Allow HTTP: Allows HTTP (insecure) connection to the services
The rules dynamic block creates for each host a rule to direct to the Istio gateway. It basically creates blocks like this:
Virtual services
The way of telling Istio where to direct the incoming traffic is through virtual services. Therefore we need to create one per each host we want to redirect.
Wrapping it all together in a module
All those resources are contained in a module where we can set the variables. This way we only need to set them and apply the plan in terraform. For our example, we created the module the following way:
We have created two hosts and one virtual service for each one in order to create several managed certificates and show how you can easily add new ones. This way your Gke cluster can have several services and deploy all of them on the same load balancer easily.
The variable use_crds needs to be set to false in the first “apply” in order to install the CRDs. After applying that plan you set the variable to true and apply again, this terraform does not try to create resources whose CRD is not found, which triggers an error.
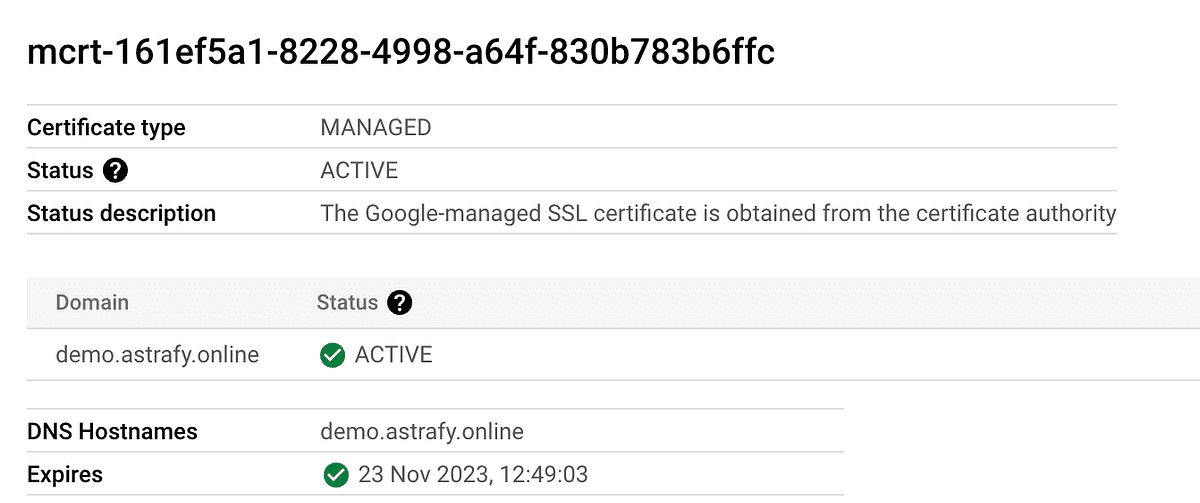
After this process, we only need to wait for the Managed Certificates to be provisioned by Google and we will be able to access our application. To check that we can go to the Load Balancer page on the project where you created the project. In the following picture, we see that the certificate has already been provisioned after half an hour.
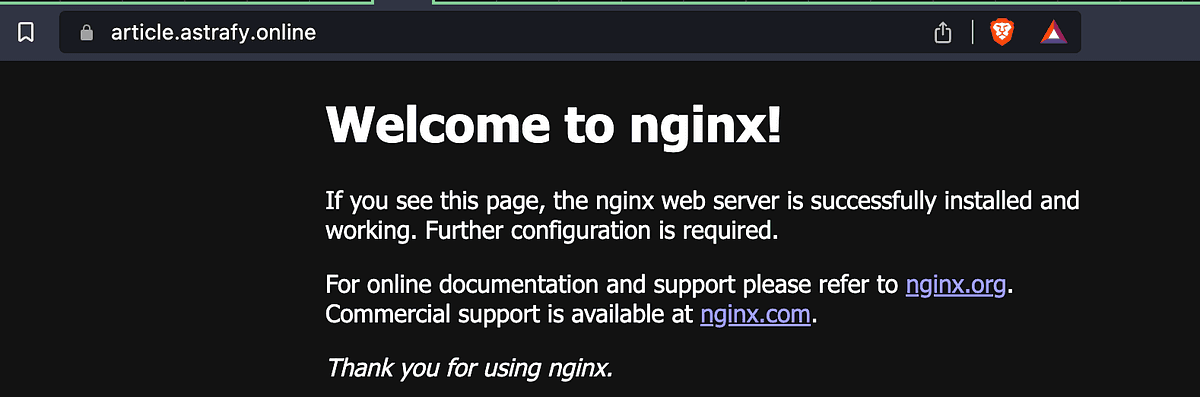
And, after populating our DNS pointing to the IP address created by Terraform, we can access the website from the browser with HTTPs.

Conclusion
This module has saved us a lot of time deploying applications publicly on different GKE clusters. When we need to repeat this process in a new one we just need to add it to the corresponding terraform module, populate the variables, and… voilà.
As a best-practice disclaimer, the fact of using the use_cdrs variable in order to first make the installation of Istio’s CRDs and then apply the resources on a second plan is not the best practice but the quickest one. When moving from a development environment to a testing or production one you should not need to change the code and swap the boolean of any flag. Ideally, in a production environment, we would be able to do it in a single plan but since that’s not yet supported we need to go with a different strategy. Those include installing the CDRs on a different Terraform configuration or using a DevOps tool like ArgoCD.
The module has some more functionalities such as the ability to be used in a private cluster. In that case, you would need to add the VPC in which the cluster resides and the project as variables to the module.
Feel free to use it! Take into account it’s not meant for all environments and maybe you’ll need to tweak it a little bit depending on your use case. However, my goal was that you get a wide understanding of how this is done and save you some precious time.
You can check out the code used in the article in this GitHub repository.
Thank you
If you are looking for support on Data Stack or Google Cloud solutions, feel free to reach out to us at sales@astrafy.io.


