
The power of Open Source is the power of the people. The people rule. “Philippe Kahn”
At Astrafy we eat our own dog food and for this reason we decided to setup a GKE cluster (i.e. “Google Kubernetes Engine”) to host all the Modern Data Stack applications that we preach.
In this article we will go over the architecture design and the set up of this cluster to host our different applications. The main sections of this article are:
GKE cluster
Service Mesh with Istio
Access Management
FinOps
Monitoring
Template to install applications on the cluster
Benefits of hosting Open-source Data Stack on GKE
GKE cluster
After brainstorming internally on the best Google Cloud “Compute” product, GKE stood out as a clear winner. It gives us the flexibility to leverage native kubernetes resources, to be fully flexible in terms of networking via Istio service Mesh (more on this in the following section), to deploy our applications using official docker images packaged into helm charts and to have full control on scalability.
Hereafter is a high-overview architecture of what we deployed. We will make the terraform code to deploy the green rectangle available in the coming weeks. Make sure to follow us on LinkedIn to get notified.

In the green rectangle is our GKE cluster deployed on our internal OPS project. We deployed the cluster using an official terraform module from Google Cloud (module code here). We made the cluster private for the node pool (i.e. no public IPs for the nodes) and with restricted access to the control plane (using master authorised network). As Terraform Cloud does not have fixed IP ranges and as we need to reach our GKE cluster from Terraform, we allowed the range “0.0.0.0/0” to reach our cluster. This makes the control plane reachable from any IPs and was needed to allow terraform to reach our cluster and deploy resources on it. This does not mean that anyone can access our control plane; Google Cloud IAM roles still apply and without being properly authorised, you won’t get access to the cluster.
As far as networking is concerned we always remove the default network from our Google Cloud projects and then create only necessary ones based on our needs. We also recommend for larger organisations to go with a “hub and spoke” approach where networks are only created on dedicated projects and subnets are then shared from those projects to consumer projects; this is achieved using the shared vpc feature of Google Cloud. For our use case we created one network with one subnet in a European region. We then added two secondary ranges to this subnet; respectively for the services and pods ranges. As the nodes are fully private, internet access is enabled via Cloud Nat that offers a good layer of protection for egress traffic.
For the node pool, the default one is removed upon installation and a dedicated node pool “mds” (for Modern Data Stack) is created. Different variables are set up to define the machine type, min count of nodes, max count of nodes, if the nodes should be preemptible, etc. We will discuss some of those parameters in the FinOps section as some of those can have a significant impact on the cost of your cluster.
Last but not least, we have hardened the security of our cluster with the following features:
Binary Authorization
Dedicated service account for the node pool
Shielded nodes
Workload identity
Database encryption
For more information on how to harden your GKE cluster security, check out this article:
https://cloud.google.com/kubernetes-engine/docs/how-to/hardening-your-cluster
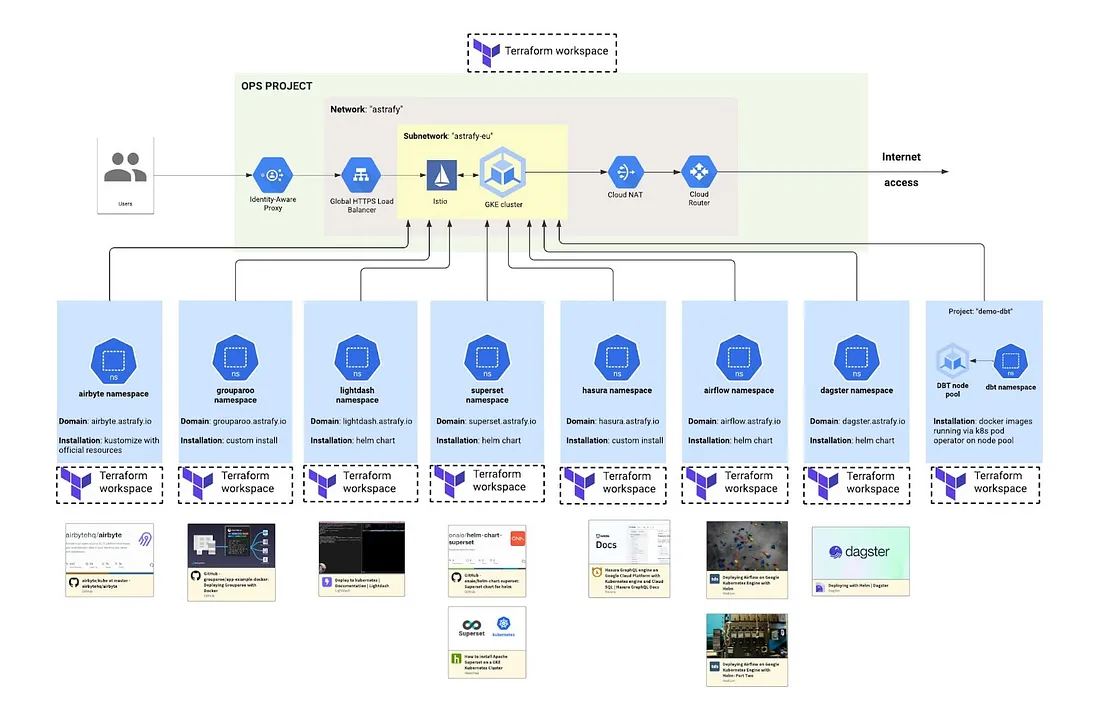
The blue rectangles in the architecture above refer each to an application that will be deployed on the cluster. Those applications are dbt, airflow, lightdash, etc. and each application code to deploy on the cluster is isolated in a separate codebase with a dedicated terraform workspace attached to it. This makes the deployment isolated and easy to manage and extend. Last section of this article will go over the installation of those applications on the cluster.
Service Mesh with Istio
A service mesh is an infrastructure layer that aids in communication between services or microservices, using a proxy. As applications are decomposed from monoliths, all of the resulting microservices need new tools to address the connectivity challenges that arise in handling distributed services. An Istio service mesh defines both the control plane (to configure desired service connectivity and behaviour) and the data plane (to direct traffic, enforce security rules, and provide observability).
Istio is the de-facto service mesh for Kubernetes and it was a no-brainer to use for our cluster. Adding new applications to our cluster would otherwise require a lot of boilerplate and maintenance. This is abstracted away by setting up once Istio properly and then deploying VirtualServices objects for each new application. Istio then takes care of routing the frontend service of each application. Below is an example of the VirtualService deployed by Terraform for Airbyte deployment. The host is “airbyte.astrafy.io” and the host contains the information about the airbyte service that has been deployed via Kustomize on our GKE cluster.

The following architecture describes the role of Istio to distribute traffic between the different services.

HTTPS traffic gets terminated at the Load Balancer level. From there onwards, traffic is conveyed via HTTP. Security-wise this is not an issue as the Load Balancer is the entry point to the cluster and will stop any malicious traffic. Once the traffic enters the cluster, Istio acts as a service mesh and takes the lead to direct the traffic to intended services. In case a user hits the url “airbyte.astrafy.io”, Istio will direct this request to the “Airbyte webserver” service on the GKE cluster. Behind the hood, this happens via the Istio control plane and the different VirtualServices deployed; those have the logic on where to redirect traffic. Inside each service, Istio then deploys a sidecar proxy that is injected within each pod and that handles the networking part for each pod.
This was a very short introduction about Istio and how we use it practically for our “Modern Data Stack” use case at Astrafy. If you want to learn more about Istio, we recommend the official documentation here.
Access Management
We want our GKE cluster to be as safe as it can be but at the same time easy to access for users that need access to it. This was achieved using IAP (i.e. Identity-Aware proxy) in front of our GKE cluster; there is a native integration of IAP with GKE that made it a simple choice. All our different application domains point to the global IP of the ingress and the landing page is a “Google Sign In” page that will prompt for your Google account credentials. In case your account is authorized to access the application you will be redirected to the landing page of the application. Authorization is given via the role “IAP-Secured Web App User” and is given to Google groups and not to individual users.
Some applications also have their own RBAC and configuring it is done directly within the application. This sets a second layer of defense as IAP will always stand as the first entrance door. Airflow for instance has an evolved RBAC management that gives a high level of granularity on what users can do within Airflow based on the RBAC roles they are assigned.
Regarding access of the GKE cluster to other Google Cloud resources, this is managed via Workload identity. As per Google Cloud documentation:
Workload Identity allows workloads in your GKE clusters to impersonate Identity and Access Management (IAM) service accounts to access Google Cloud services.
The huge benefit of it is that you don’t have to create json keys for your service accounts anymore. The kubernetes service account inherits from the permissions of the underlying Google Cloud service account. Using workload identity simplifies a lot the IAM management while making your Google Cloud project safer as no json keys are created.
FinOps
As a small company, each cent matters and we strive to optimize the parameters of each resource we deploy to be as cost-efficient as possible. It wouldn’t make sense either to go for open-source technologies and then pay a lot of money on hosting those applications. We started by studying each component generating cost for a GKE cluster. We noticed that The GKE free tier provides $74.40 in monthly credits per billing account that are applied to zonal and Autopilot clusters. This means that you will save the cluster management fee if you go with a zonal cluster. Aside from this cluster management fee you have to pay for each node that makes up your GKE cluster. We recommend to start with the “e2” machine types and here is the monthly price you will pay based on your choice:

At the time of writing, our workload with those applications is still light and therefore we started with the “e2-standard-2” and for just 53 USD per month, we are leveraging the full power of GKE with all our modern data stack applications. As we expect to keep this cluster live at all times and our workload to increase over time, we plan to make a 1-year commitment for a machine type “e2-standard-4” for 68 USD a year.
The table above also lists the price for machine types provisioned under the preemptible schema. As per Google documentation:
Preemptible VM instances are available at much lower price — a 60–91% discount — compared to the price of standard VMs. However, Compute Engine might stop (preempt) these instances if it needs to reclaim the compute capacity for allocation to other VMs. Preemptible instances use excess Compute Engine capacity, so their availability varies with usage.
We use a preemptible machine type “e2-standard-4” in a separate node pool on our GKE cluster for all our dbt operations. As we don’t mind this node to be shut down and restarted, a preemptive node is the most cost-efficient solution for that use case. Our dbt operations are scheduled from Airflow hosted on our “mds’’ node pool and are then executed on our “dbt” node pool. This dbt design is well explained in the series of articles “dbt at scale on Google Cloud”.
Last but certainly not least we monitor our cluster cost through Data Studio dashboards. The cost per node is fixed so there should not be any surprises on the total cost but as we have auto-scaling up to two nodes, this cost may vary on a day-to-day basis. This dashboard is also quite granular and allows us to see the namespaces that are consuming most resources (each application we install belongs to a dedicated namespace). To set up this dashboard we mainly took inspiration from this article. We are running the different sql that make up this dashboard via dbt and run those queries once a day via an Airflow DAG. We will write a separate article on this dbt flow that uses the billing export and the gke usage metering export as source data. Below is a screenshot of one of the dashboard we get from this data:

Monitoring
If you can’t measure it, you can’t control it. This famous adage applies obviously to GKE and while this product is a fully managed version of Kubernetes, it remains of major importance to have full observability on all the metrics available. This allows you to fine-tune at best parameters such as resource utilisation, horizontal pod auto scaler, vertical pod auto scaler and so on. Google cloud provides out-of-the-box monitoring via its Google Cloud’s Operations suite. In the UI of that product you will find a “Dashboards” section where you can see a list of names for most famous Google Cloud products.

After adding GKE to your favourite and clicking on it, you will land on a command centre page with a multitude of metrics (see screenshot below). If you want additional metrics, you can go into the “metrics explorer” and define your own metric that you can then add to a custom dashboard.

Template to install applications on the cluster
We wanted flexibility, accessibility, security and standardisation as main features to install new applications on our cluster. We got all of those by using GKE, Istio, helm, kustomize and terraform with a dedicated git repository and dedicated terraform workspace.
The following architecture describes in high-overview the deployment of each application:

We use official helm charts of the application for each deployment and in order to customise those deployments and have different deployments per environment we use kustomize. Kustomize gives the possibility to amend all the values of the helm chart (those defined in the default “values.yaml” of the helm chart) in a clean and robust way via overlays. At Astrafy we only have one internal cluster for cost reasons but we usually recommend having different clusters per environment (for instance one for dev, one for uat and one for prd as per the architecture above).
As far as networking is concerned, our requirement was to be able to access each application via the following url:
[APPLICATION].astrafy.io
For instance “airflow.astrafy.io” for airflow, “airbyte.astrafy.io” for airbyte and so on. This was made possible very easily through Istio and each application deployment codebase just needs to deploy a Kubernetes “VirtualService” object where subdomain and application UI is defined.
In the light of one of our core values which is open-sourcing, the different repositories to install those applications will be made available via our public Gitlab. We will also write a short article for the deployment of each application and those will serve as tutorials for each deployment.
The following architecture describe the decoupling of code and terraform workspaces for the deployment of the GKE and the different applications:

On the left we have the repository for deploying the GKE cluster with Istio. This repository is linked to a Terraform Cloud workspace.
On the right we have one generic repository containing the code to deploy the application. A terraform module is created from this repository and made available publicly on the terraform registry. There is then the application deployment repository that is calling the module and deploying the application on the GKE cluster.
Benefits of hosting Open-source Data Stack on GKE
We couldn’t end this article without stating the major benefits of hosting this Modern Data Stack on GKE. Michael Guarino from Plural described those benefits well in a similar article here.
Cost savings: The biggest benefit by far is the cost that you can save by deploying this stack. As described in the FinOps section, you can get as low as 24 USD per month for a e2-standard-2 VM with a 3-year commitment. Of course the more workload you have, you will have to scale vertically and horizontally but as compared to paying vendors to leverage this stack, the savings are huge. Often if you were to buy a managed service solution it usually comes with a 40% markup to compute, and if you are doing large-scale batch processing jobs that cost adds up quickly.
Simpler security model: By installing from scratch on native GKE, you have absolutely full control over your security with no worries about privacy and compliance issues. Being able to have strong compliance and privacy around product analytic suites is especially helpful when you begin to talk about GDPR and CCPA environments that are challenging to enforce across the board at scale.
Operationally simpler to scale out to multiple solutions: With this implementation, you end up with all your “Modern Data Stack” sitting on the same cluster in different namespaces. This allows you to control the health of your applications, upgrades, dependencies, etc. from a single pane of glass (for instance k9s or lens). It also creates consistencies around deployment of those applications as explained in the previous section. Last but not least, it allows the creation of a unified point of access via subdomains and IAP that will only allow access to authorised users.
If you enjoyed reading this article, stay tuned as more articles will come in the coming days/weeks for each of the “Modern Data Stack” applications we have deployed on our GKE cluster. Follow Astrafy on LinkedIn to be notified for the next article ;).
If you are looking for support on Data Stack or Google Cloud solutions, feel free to reach out to us at sales@astrafy.io.


